鸡腿遥控器
标签:电动滑板 遥控器
动力老男孩 发布于 2015-07-02 14:23
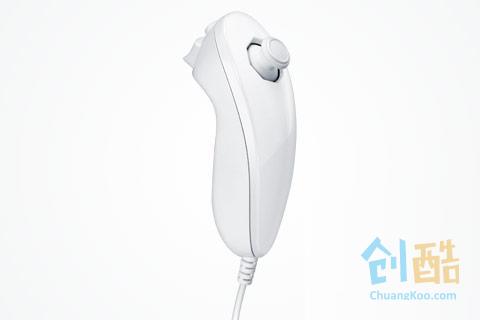
这里说的鸡腿,是指Wii经典的游戏手柄nunchuck。
这个单词到底是什么意思其实我也不知道,也不知道该怎么发音。不过大家一般都亲切的把它称为“小鸡腿”,看上去还真有点儿神似。
毕竟是大公司的经典工业设计产品,手感非常好!
Step 1: 功能区设计
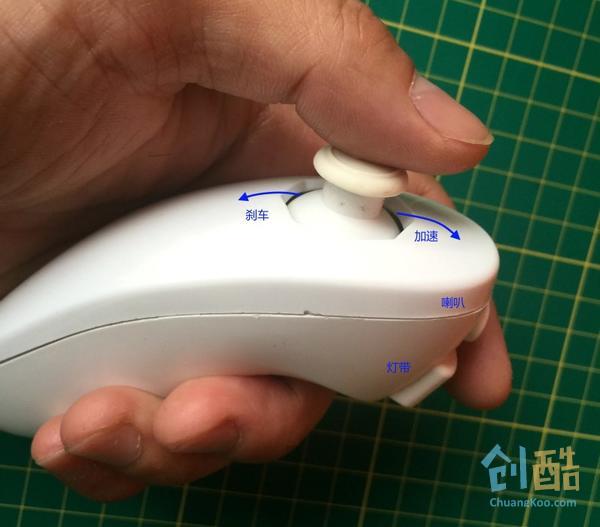
原来的遥控器,只有一个JoySticker摇杆,自带一个按键。
而这个鸡腿有一个摇杆和两个按键,实际上它里面还有一个陀螺仪,不过我暂时没有想好用陀螺仪来做什么。
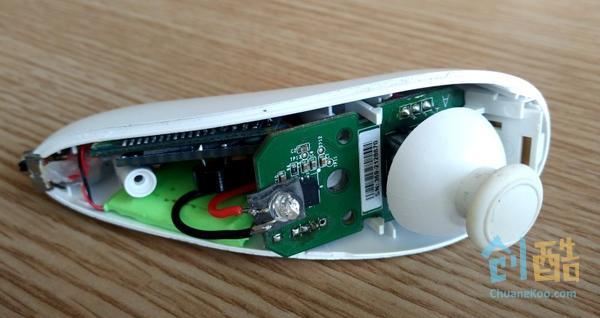
Step 2: 各种组装

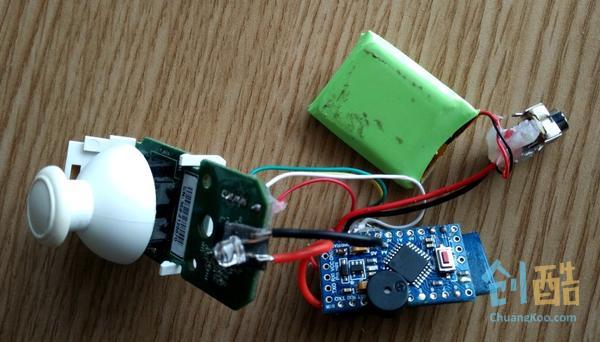
由于鸡腿里面的空间比较小,所以原来的洞洞板或者PCB板全都放不进去,只能裸奔着用飞线连接,然后一大坨塞进去。
另外,鸡腿里面的隔板还得剪掉,好在这个鸡腿不承力,强度还是够用的。
Step 3: 鸡腿遥控器接线图
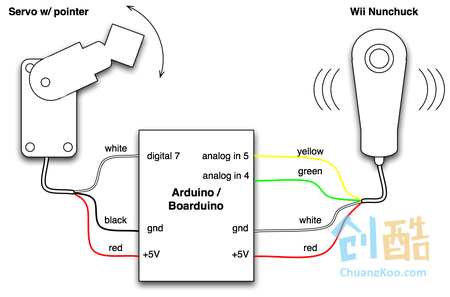
这是接口的介绍图
Step 4: 充电口和开关
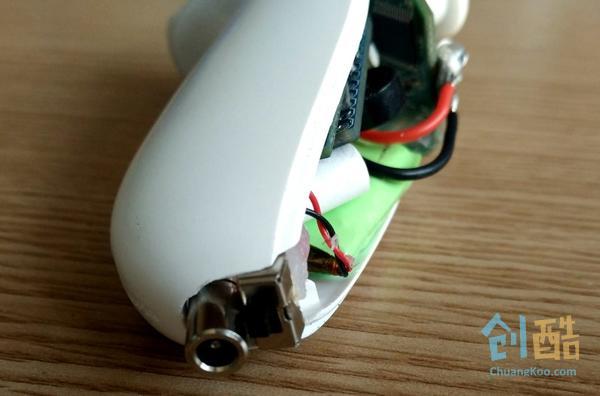
原来的鸡腿是带线的,做遥控器当然要把线剪掉。
尾巴那里正好就可以用来安装充电口和开关。电路图你们就别找我要啦,这么简单个操作,跟连个灯泡是一样的 :)
Step 5: 蓝牙指示灯

把电路塞进鸡腿之后,有个比较大的麻烦就是指示灯。原来可以通过指示灯的闪烁,来判断蓝牙是否连接成功,现在全塞在里面了。
为了解决这个问题,我用小电钻在鸡腿上打了个小孔,然后在里面嵌了一个LED灯。
实践证明,虽然蓝色灯看上去比较漂亮,但是白天几乎看不清,还是用红色灯比较醒目。
鸡腿里面的空间太小,这个灯装的非常牵强,几乎是硬卡在那里的。有兴趣的同学以后可以改用贴片的那种小LED。
Step 6: nunchuck使用的Arduino库
在网上能找到很多针对numchuck的Arduino代码库,但是因为Arduino版本升级的原因,大部分都已经不能用了,编译错误。
点此查看电动滑板的全部攻略目录
我做了一些修改,目前Arduino的版本1.6.5已经可以顺利跑通。代码如下:
文件保存为 nunchuck.ino
static uint8_t nunchuck_buf[6]; // array to store nunchuck data,

// Uses port C (analog in) pins as power & ground for Nunchuck
static void nunchuck_setpowerpins()
{
#define pwrpin PC3
#define gndpin PC2
DDRC |= _BV(pwrpin) | _BV(gndpin);
PORTC &=~ _BV(gndpin);
PORTC |= _BV(pwrpin);
delay(100); // wait for things to stabilize
}

// initialize the I2C system, join the I2C bus,
// and tell the nunchuck we're talking to it
void nunchuck_init()
{
Wire.begin();	// join i2c bus as master
Wire.beginTransmission(0x52);	// transmit to device 0x52
Wire.write(0x40);	// sends memory address
Wire.write(0x00);	// sends sent a zero.
Wire.endTransmission();	// stop transmitting
}

// Send a request for data to the nunchuck
// was "send_zero()"
void nunchuck_send_request()
{
Wire.beginTransmission(0x52);	// transmit to device 0x52
Wire.write(0x00);	// sends one byte
Wire.endTransmission();	// stop transmitting
}

// Receive data back from the nunchuck,
// returns 1 on successful read. returns 0 on failure
int nunchuck_get_data()
{
int cnt=0;
Wire.requestFrom (0x52, 6);	// request data from nunchuck
while (Wire.available ()) {
// receive byte as an integer
nunchuck_buf[cnt] = nunchuk_decode_byte(Wire.read());
cnt++;
}
nunchuck_send_request(); // send request for next data payload
// If we recieved the 6 bytes, then go print them
if (cnt >= 5) {
return 1; // success
}
return 0; //failure
}

// Print the input data we have recieved
// accel data is 10 bits long
// so we read 8 bits, then we have to add
// on the last 2 bits. That is why I
// multiply them by 2 * 2
void nunchuck_print_data()
{
static int i=0;
int joy_x_axis = nunchuck_buf[0];
int joy_y_axis = nunchuck_buf[1];
int accel_x_axis = nunchuck_buf[2]; // * 2 * 2;
int accel_y_axis = nunchuck_buf[3]; // * 2 * 2;
int accel_z_axis = nunchuck_buf[4]; // * 2 * 2;

int z_button = 0;
int c_button = 0;

// byte nunchuck_buf[5] contains bits for z and c buttons
// it also contains the least significant bits for the accelerometer data
// so we have to check each bit of byte outbuf[5]
if ((nunchuck_buf[5] >> 0) & 1)
z_button = 1;
if ((nunchuck_buf[5] >> 1) & 1)
c_button = 1;

if ((nunchuck_buf[5] >> 2) & 1)
accel_x_axis += 2;
if ((nunchuck_buf[5] >> 3) & 1)
accel_x_axis += 1;

if ((nunchuck_buf[5] >> 4) & 1)
accel_y_axis += 2;
if ((nunchuck_buf[5] >> 5) & 1)
accel_y_axis += 1;

if ((nunchuck_buf[5] >> 6) & 1)
accel_z_axis += 2;
if ((nunchuck_buf[5] >> 7) & 1)
accel_z_axis += 1;

Serial.print(i,DEC);
Serial.print("t");

Serial.print("joy:");
Serial.print(joy_x_axis,DEC);
Serial.print(",");
Serial.print(joy_y_axis, DEC);
Serial.print(" t");

Serial.print("acc:");
Serial.print(accel_x_axis, DEC);
Serial.print(",");
Serial.print(accel_y_axis, DEC);
Serial.print(",");
Serial.print(accel_z_axis, DEC);
Serial.print("t");

Serial.print("but:");
Serial.print(z_button, DEC);
Serial.print(",");
Serial.print(c_button, DEC);

Serial.print("rn"); // newline
i++;
}

// Encode data to format that most wiimote drivers except
// only needed if you use one of the regular wiimote drivers
char nunchuk_decode_byte (char x)
{
x = (x ^ 0x17) + 0x17;
return x;
}

// returns zbutton state: 1=pressed, 0=notpressed
int nunchuck_zbutton()
{
return ((nunchuck_buf[5] >> 0) & 1) ? 0 : 1; // voodoo
}

// returns zbutton state: 1=pressed, 0=notpressed
int nunchuck_cbutton()
{
return ((nunchuck_buf[5] >> 1) & 1) ? 0 : 1; // voodoo
}

// returns value of x-axis joystick
int nunchuck_joyx()
{
return nunchuck_buf[0];
}

// returns value of y-axis joystick
int nunchuck_joyy()
{
return nunchuck_buf[1];
}

// returns value of x-axis accelerometer
int nunchuck_accelx()
{
return nunchuck_buf[2]; // FIXME: this leaves out 2-bits of the data
}

// returns value of y-axis accelerometer
int nunchuck_accely()
{
return nunchuck_buf[3]; // FIXME: this leaves out 2-bits of the data
}

// returns value of z-axis accelerometer
int nunchuck_accelz()
{
return nunchuck_buf[4]; // FIXME: this leaves out 2-bits of the data
}
点此查看电动滑板的全部攻略目录
Step 7: 调用小鸡腿的Arduino控制程序
文件保存为 Controller.ino,这一部分是跟滑板通讯的代码:
#include <Wire.h>;
#include <SoftwareSerial.h>

SoftwareSerial mySerial(12, 11);

// The Led pin for debug
int ledPin = 13;
int light = 1;
int counter = 0;

// Use to check if the button is down
boolean buttonC_Down = false;
boolean buttonZ_Down = false;

// battery related
int batteryPin = 0;
int batteryScale = 2;

// Connect to speaker
int tonePin = 3;

void CheckButtonState()
{
  int cButton = nunchuck_cbutton();
  if (cButton != buttonC_Down) {
    buttonC_Down = cButton;
    if (buttonC_Down) {
      //tone(tonePin, 4000);
      mySerial.write((byte) 255);
      mySerial.write((byte) 204);
    } else {
      //noTone(tonePin);
      mySerial.write((byte) 255);
      mySerial.write((byte) 205);
    }
  }
  int zButton = nunchuck_zbutton();
  if (zButton != buttonZ_Down) {
    buttonZ_Down = zButton;
    if (buttonZ_Down) {
      mySerial.write((byte) 255);
      mySerial.write((byte) 206);
    } else {
      mySerial.write((byte) 255);
      mySerial.write((byte) 207);
    }
  }
}

void setup()
{
  Serial.begin(19200);
  mySerial.begin(9600);
  nunchuck_setpowerpins();
  nunchuck_init();
}

void switchLight()
{
  counter++;
  if (counter >= 12) counter = 0;
  else return;
  digitalWrite(ledPin, light);
  light = 1 - light;
}

int readPowerValue() {
  int readValue = nunchuck_joyy() * 100 / 256;
  readValue = 50 + 11 * (readValue - 50) / 10;
  if (readValue < 0 ) readValue = 0;
  if (readValue > 100) readValue = 100;
  return readValue;
}

void loop()
{
  long t0 = millis();
  if (mySerial.available()) {
    while(mySerial.available()) {
      byte r = mySerial.read();
      if (r == 255) {
        tone(tonePin, 4000);
      } else {
        noTone(tonePin);
      }
      //Serial.write(r);
    }
    //Serial.write("rn");
    digitalWrite(ledPin, light);
    light = 1 - light;
    counter = 0;
  }
  if (Serial.available()) {
    while(Serial.available()) {
      byte r = Serial.read();
      mySerial.write(r);
    }
  }
  nunchuck_get_data();
  int readValue = readPowerValue();
  switchLight();
  CheckButtonState();
  mySerial.write((byte)readValue);
  double T = 100;
  int leftMs = (int) (t0 + T - millis());
  delay(leftMs);
}
登录以发表评论
你好,能发一下电路图吗,看不懂
终于还是分享了,基于这个东西,我们曾希望有广泛的应用转化,分享出来,也希望大家提出各种改进意见,并期待工业设计高手加入讨论。
很完美啊,不过感觉用大拇指控制摇杆没有食指控制扳机那么灵活,可能是操作习惯的问题。
如果是控制玩具模型,肯定需要很大的灵活性,常常需要突然大幅度推拉控制杆。
如果是滑板,对灵活性的要求大大降低了,一个突然加速、滑板飞出去了,人躺下了。。。
我在手机控制端程序设想过加入保护性功能,如果很短时间内大幅度推油门,操作无效,防止窜车人倒。
食指扣扳机方便,但是刹车的时候推扳机就不太顺,而且危险时下意识的握拳反应是危险的。
另外,小新说的非常有道理,我这个摇杆应该也加一个“最大加速度”的设置
作者的最新作品
-
简易发光魔杖
2018-09-30 17:51发布
-
给电动滑板加个盒子
2015-07-13 11:11发布
-
鸡腿遥控器
2015-07-02 14:23发布
-
3D打印的电滑板支架
2015-06-22 00:15发布
-
无线供电的磁悬浮小灯
2015-06-03 00:58发布
阅读数: 16311
